
Finally it's done.
I finished the construction of my new window frame. I keep it short for now because I've written some lines about the reasons for the new construction in my last post.
The whole frame was built from 24 x 48 mm wooden latches except for the two middle posts that were built from some stronger wood.
Cutting all the different angles was very challenging. So I drew every shape to the different pieces to control the cut.
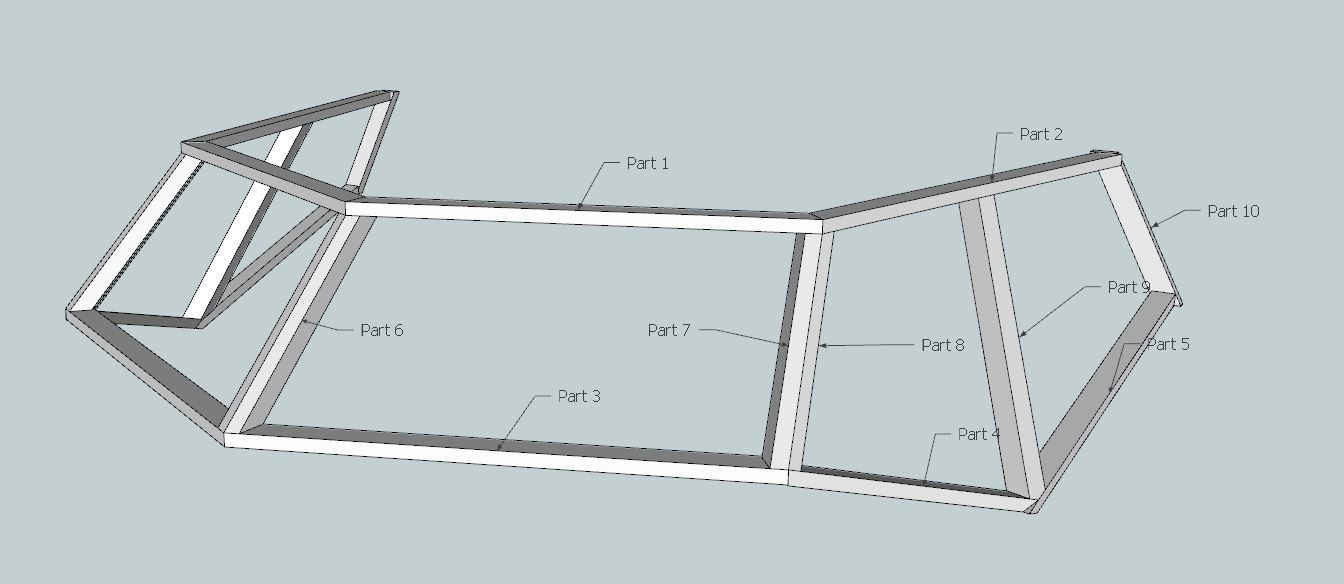
I need help on the mesurment of part 2, part 4, part 5, if anyone know it would be much apprecated.
I’m explaining this from minute 7:00 in the video. Take the measurements in the scene of the part. Take measurements of the straight lines and draw the connection on the wooden piece. Then you can estimate the angle you have to cut.
hi have downloaded sketchup make but still no measurements
any ideas please
cheers
paul
Hi Mickey, I love the videos I think they are some of the most informative on the internet to date, I have a question I’m having the hardest time finding the right angles and length for part 7 for the front window side posts, any particular advice on finding the correct angles?
Hello Louis,
this is definitly one of the hardest pieces of the front window. Maybe you can see it in the video, mine didn’t fit exactly too. I used much glue to close the gap. I would suggest to finish the front window and leave the two sides open. Then cut a piece a little bit loger than the gap to close and hold it on the outside of the frame and extend the bottom and top line of the frame to this piece. So you can orient your cut to that line.
Thanks Mickey, I have another question, when you extended the pieces by 11cm was that to all parts or just part 1 and part 3?
That were only parts 1 and 3. The parts in the sketchup file have already the right length.
Hi Mickey
Firstly, thank you for the fantastic series of videos; they are the best I have ever seen for constructing a cockpit. I would like to include your site as a reference on my website. Regarding the angles of the cuts for the windows, I’ve watched your video over and over again and read your comment of 16 June. However I can still not figure out how you determine the angles for the three dimensional cuts. Some documentation or even better still an additional video on this would be really helpful.
Greg
Hello Greg,
of course you can include my site to your reference.
I will try to document the steps to determine the angle shape with a series of photos here on the site. Maybe this will be enough to bring a little bit liht into the dark.
Many thanks Mickey. I anxiously await
Greg
Hi Mickey
First of all congratulations for a great looking sim! And thank you so much for taking time making and posting those professional looking videos and inspiring many builders out there. And thanks again for sharing those plans. It will help a lot of folks interested in this hobby.
I haven’t made special views with dimensions. It wouldn’t be enough to show one angle between two window posts because there are three dimensional angles to most of the parts. The best way to plan your cuts – and this is what I did – is to isolate one part after the other and measure the length of the four edges of the piece with the measure tool. If it is a chamfered edge then you have to use the angle measure tool on top.
Are we to the dimensions from the first window file as there are no sizes on the sketchup file. I only have sketchup viewer may be this is why i dont get the dimensions.
You can download Sketchup Make for free and thaat wiill allow you to get the measurments.